
1. Smart Lighting Systems (The Foundation)

Forget just adding dimmer switches. Full home automation lighting systems let you control everything from your phone, set schedules, and create scenes.
Why during remodeling:
- Need neutral wires at every switch (older homes don’t have these)
- Can run wires for keypads and sensors while walls are open
- Way cheaper than retrofitting later
What to install:
- Smart switches at every location
- Motion sensors in hallways and closets
- Scene controllers by doors
- Under-cabinet lighting with smart controls
Had a client in Dallas who installed Lutron Caseta throughout their renovation. Now they control 40+ lights from anywhere, set vacation mode, and never walk into a dark house.
Cost during remodel: $3,500 Cost to retrofit after: $8,000+
2. Whole-Home Audio System
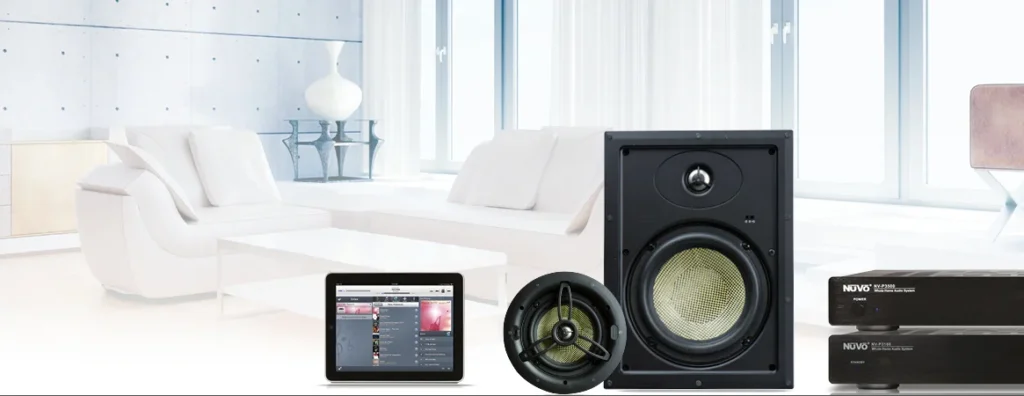
Running speaker wire while walls are open is cheap. Running it through finished drywall? Nightmare.
Built-in benefits:
- No visible wires or speakers cluttering spaces
- Better sound quality than portable speakers
- Can’t be stolen or knocked over
- Controls integrate with other smart systems
Where to install:
- In-ceiling speakers in main rooms
- Outdoor speakers on patio
- Bathroom moisture-resistant speakers
- Wired volume controls in each zone
Modern options:
- Sonos architectural speakers
- Control4 whole-home systems
- Even budget options like Russound
You’ll never use those bulky bluetooth speakers again.
3. Smart Thermostat Zones

Single-zone heating/cooling is wasteful. Your bedroom doesn’t need to be 68 degrees when nobody’s home.
Zoning during remodel:
- Add dampers to existing ductwork
- Install multiple thermostats for different areas
- Wire smart thermostats at each zone
- Set up schedules and automation
Smart thermostats worth installing:
- Nest Learning (learns your habits)
- Ecobee with room sensors
- Honeywell T6 Pro (contractor favorite)
Client saved $140 monthly on cooling after adding zones during their Dallas home remodel. ROI in under two years.
4. Security Camera Pre-Wiring

Wireless cameras work, but they’re not ideal for permanent installation.
Wired camera advantages:
- No charging batteries
- More reliable connection
- Better video quality
- Can’t be jammed or hacked as easily
Strategic locations:
- Front door
- Driveway
- Back yard access points
- Side gates
- Garage
Run Cat6 cable to each location during remodel. Costs maybe $200 in materials. Trying to do it later with visible wires? Looks terrible and costs way more.
5. Smart Door Locks and Access Control
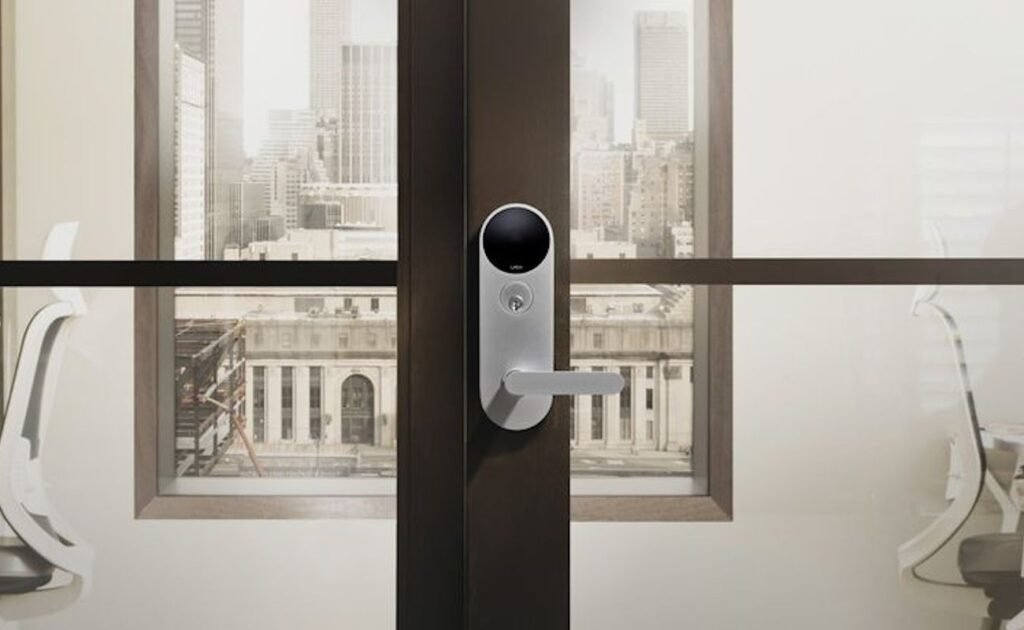
Keyed locks are obsolete. Smart locks let you give temporary access to contractors, check if doors are locked, and never worry about lost keys.
During remodel, install:
- Smart locks on all exterior doors
- Keypad by garage entry
- Video doorbell with two-way audio
- Smart garage door opener
Additional wiring:
- Power for video doorbell (battery-powered ones are annoying)
- Hardwired connection for garage opener
- Backup power for critical access points
Watched a home automation client lock out a would-be burglar in real-time from her phone while on vacation. He was caught on camera trying codes for 10 minutes before giving up.
6. Network Infrastructure (Most Important)
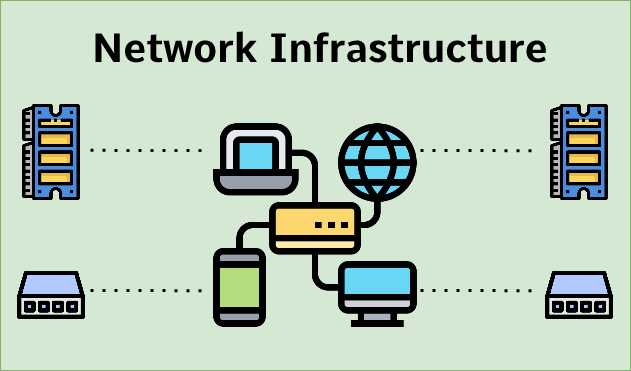
Smart home remodeling runs on your network. Bad WiFi = everything sucks.
Wire it right during construction:
- Cat6 ethernet to every room
- Central network closet with professional gear
- WiFi access points hardwired (not mesh)
- Outdoor access point for patio/yard
Network closet needs:
- Structured wiring panel
- Network switch
- Router
- Patch panel
- Power backup
Spent $2,500 on proper network infrastructure during a remodel. Client now has gigabit speeds in every room and zero dead zones. Mesh systems can’t touch this performance.
7. Motorized Window Treatments

Sounds bougie until you have 20-foot windows that are impossible to reach.
Makes sense for:
- High windows
- Heavy drapes
- Skylights
- Privacy control automation
Wiring requirements:
- Power at each window
- Control switches
- Integration with lighting scenes
Program them to close at sunset, open at sunrise, or close when watching movies. Client with huge south-facing windows programmed shades to close during hottest part of day – cut cooling costs by $80/month.
8. Smart Kitchen Appliances
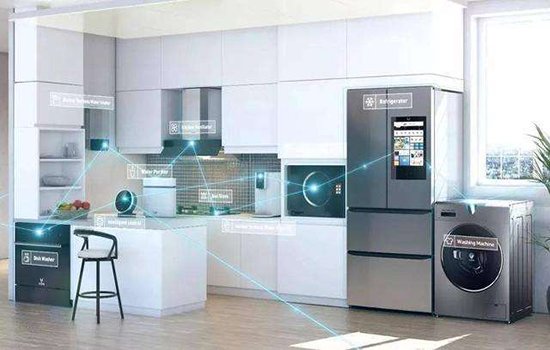
Replacing appliances during kitchen remodel? Get smart versions.
Actually useful smart appliances:
- Refrigerator with cameras inside (check what you have at store)
- Oven with remote preheat and monitoring
- Dishwasher with cycle notifications
- Coffee maker on schedule
Skip these:
- Smart slow cookers (gimmick)
- WiFi-enabled microwaves (pointless)
- Connected toasters (seriously?)
The fridge camera thing seems dumb until you’re at the store wondering if you need milk. Pull up the app, check inside your fridge. Boom.
9. Water Leak Detection System
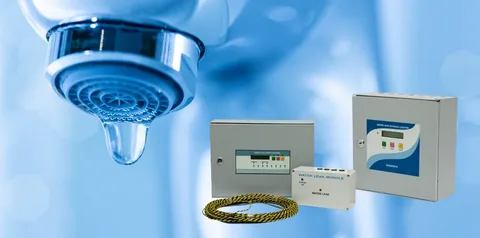
Water damage is expensive. Prevention is cheap during remodel.
Install sensors at:
- Under every sink
- Behind washing machine
- Water heater
- Dishwasher
- Bathroom toilets
Smart water features:
- Automatic shutoff valves
- Flow monitoring
- Leak alerts to phone
- Usage tracking
Detected a washing machine leak at a client’s house at 3 AM. Automatic shutoff valve stopped the leak before major damage. Without it? Would’ve flooded the entire first floor.
Cost: $1,200 for whole system Average water damage claim: $10,000+
10. EV Charger Pre-Wiring
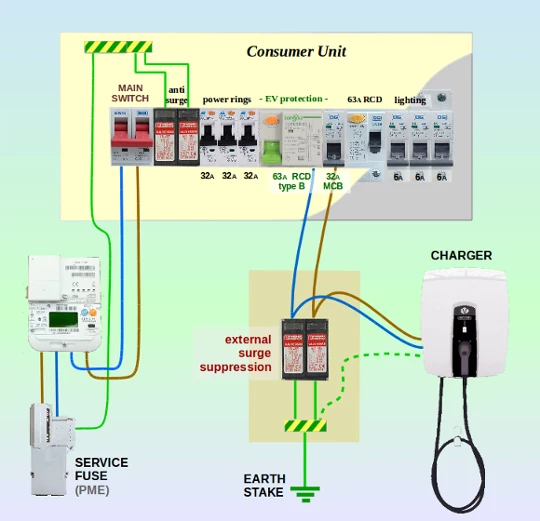
Even if you don’t have an electric vehicle now, you probably will eventually.
During remodel:
- Run 240V circuit to garage
- Install NEMA 14-50 outlet or hardwired charger
- Consider future panel capacity
- Add conduit for easy upgrades
Charging options:
- Level 2 hardwired charger (fastest)
- NEMA outlet (flexibility)
- Smart charger with scheduling
Running 240V circuit during construction: $800 Running it through finished walls later: $2,500+
Plus you’re ready when you buy that electric truck in five years.
Integration: Making It All Work Together
The real power of home automation is when everything talks to each other.
Automation examples:
- “Goodnight” button locks doors, arms security, closes shades, turns off lights
- Motion sensor turns on bathroom light at 10% brightness at night
- Garage opening triggers entry lights and adjusts thermostat
- Security camera motion triggers outdoor lights
Integration platforms:
- Control4 (professional, expensive)
- Home Assistant (DIY, powerful)
- SmartThings (middle ground)
- Apple HomeKit (if you’re all-in on Apple)
What to Skip
Not all smart tech is worth installing during remodeling.
Probably skip:
- Smart toilets (maintenance nightmare)
- Mirror TVs (gimmick)
- Smart pet feeders (battery-powered work fine)
- Connected trash cans (why?)
Budget Planning
Smart home remodeling costs vary wildly based on home size and features.
Basic smart setup: $5,000-10,000
- Lighting control
- Smart thermostats
- Network infrastructure
- Basic security
Mid-range setup: $15,000-25,000
- Everything in basic
- Audio system
- Camera system
- Motorized shades
Full automation: $40,000-80,000+
- Professional control system
- Whole-home integration
- Custom programming
- High-end components
ROI Reality Check
Some smart tech pays for itself, some doesn’t.
Positive ROI:
- Smart thermostats (energy savings)
- Leak detection (prevents damage)
- Security systems (insurance discounts)
- EV charger (adds home value)
Break-even or negative:
- Motorized shades (convenience only)
- Audio systems (lifestyle upgrade)
- Most connected appliances
But not everything’s about ROI. Some stuff just makes life better.
Working With Contractors
Smart home remodeling requires coordination between trades.
Who needs to be involved:
- Electrician (most critical)
- Low-voltage installer
- HVAC contractor
- Plumber (for leak detection)
- Smart home integrator
Common contractor mistakes:
- Not leaving enough wire
- Using wrong wire types
- Poor labeling
- No service loops
- Wrong box depths
Hire contractors who’ve done smart homes before. The $200 you save using cheap help costs $2,000 to fix later.
Future-Proofing
Technology changes fast. Wire for tomorrow, not just today.
Future-proofing strategies:
- Conduit everywhere possible
- Extra wire pulls
- Oversized junction boxes
- High-capacity electrical panel
- Abundant network drops
Client ran empty conduit to attic during remodel “just in case.” Two years later, easily added solar panel monitoring through existing conduit. Would’ve cost $1,500 to install that conduit after the fact.
Dallas Specific Considerations
Home automation in Texas has unique requirements.
Climate factors:
- Heavy AC usage makes smart thermostats critical
- Humidity monitoring prevents mold
- Storm alerts for severe weather
- Outdoor cameras for package theft (common here)
Local codes:
- Arc-fault requirements
- Tamper-resistant outlets
- Specific inspection requirements
Work with local contractors who know Dallas building codes.
[Link to: “Smart Home Remodeling Services“]
Common Questions Before Starting
“Is all this smart stuff reliable?” Quality systems are. Cheap Amazon gadgets? Hit or miss. Use established brands with local dealer support.
“What if technology changes?” Proper wiring lasts decades. Control systems can be upgraded. Infrastructure investment pays off long-term.
“Can I DIY any of this?” Lighting and thermostats maybe. Network infrastructure and whole-home systems? Hire professionals.
The Bottom Line
Smart home remodeling costs more upfront but makes sense long-term. It’s easier, cheaper, and cleaner to do it during construction than retrofit later.
You’re already spending money on the remodel. Adding smart tech during construction typically adds 5-10% to total cost. Doing it after completion? Could double or triple the tech installation costs.
Plus you get to live with all the benefits from day one instead of wishing you’d done it later.
Don’t Leave Money in the Walls
Every remodel I see without smart home infrastructure makes me sad. You’ve got walls open, contractors on-site, and the perfect opportunity to do it right.
Six months after moving back in, you’ll wish you’d added that network wire. Or those speaker cables. Or that extra electrical circuit.
Ready to plan your smart home remodel? Do it while walls are open, contractors are coordinated, and it’s actually affordable. Your future self will thank you every time you unlock your door with your phone or adjust the temperature from bed.
People Ask:
How much does it cost to add smart home technology during a remodel? Basic smart home features add $5,000-10,000 to a remodel. Mid-range systems run $15,000-25,000. Full automation costs $40,000-80,000+. Installation during construction costs 40-60% less than retrofitting later.
What’s the most important smart home tech to install during remodeling? Network infrastructure is most critical – proper wiring, ethernet drops, and WiFi access points. Everything else depends on this foundation. Second priority is electrical infrastructure for smart lighting and thermostats.
Can I add smart home features after remodeling is complete? Yes, but it costs significantly more and looks worse. Fishing wires through finished walls, dealing with visible cables, and patching drywall makes retrofitting 2-3x more expensive than installing during construction.
Do smart home features increase home value? Quality smart home systems can add 3-5% to home value, especially in tech-forward markets. Features buyers value most: security systems, smart thermostats, EV charging, and whole-home audio.
What smart home technology should I avoid during remodeling? Skip gimmicky items like smart toilets, mirror TVs, and connected trash cans. Focus on functional technology that improves daily life or saves money. Avoid anything that requires expensive ongoing subscriptions.
